Let’s get one thing straight — healing a sprained ankle completely overnight isn’t humanly possible. That’s just not how our bodies work. But here’s the good news: with the right approach, you can dramatically reduce pain, swelling, and improve mobility by the next morning. So if you’re reading this with an aching ankle and want to know about how to heal a sprained ankle fast, don’t worry. You’re in the right place.
What Actually Happens When You Sprain Your Ankle
A sprained ankle happens when one or more of the ligaments that support your ankle stretch beyond their limits — or worse, tear. Most often, it’s the lateral ligaments on the outside of your ankle that get damaged when your foot rolls inward.
Ligaments are like tough rubber bands holding your bones together. When they get yanked the wrong way, they swell, ache, and leave you limping. The most common cause? Stepping awkwardly on an uneven surface, sports injuries, or missing a step.
The moment it happens, the clock starts ticking on your recovery. What you do in the first few hours can literally shave days off your healing time. That’s why this guide is your secret weapon.
Grades of Ankle Sprains
Not all sprains are created equal. Knowing what “grade” your sprain is can help you gauge your healing time and the right treatment:
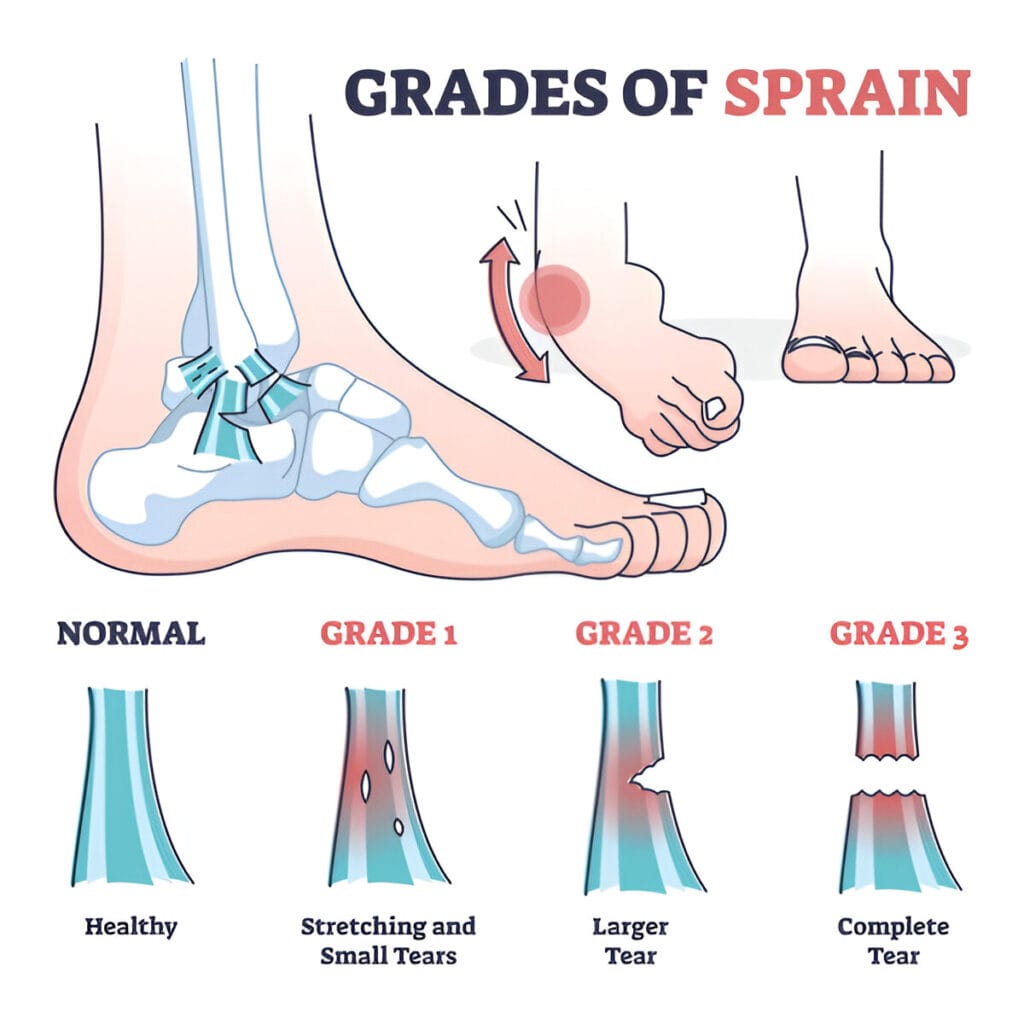
- Grade I (Mild): Ligaments are stretched but not torn. Mild pain, swelling, slight bruising. You can walk, but it’s uncomfortable.
- Grade II (Moderate): Partial ligament tear. Moderate pain, swelling, trouble walking. Bruising may show up within hours.
- Grade III (Severe): Complete ligament tear. Severe pain, major swelling and bruising, and inability to bear weight.
If you’re dealing with a Grade I or II, this article is your goldmine. Grade III? You’ll still find relief here, but make sure you see a doctor too.
Symptoms You Should Never Ignore
Some ankle injuries need more than ice and elevation. See a healthcare provider if you experience:
- Intense, sharp pain that doesn’t improve within a few hours
- Visible deformity (your ankle looks crooked or out of place)
- Inability to bear weight at all
- Numbness or tingling
- Swelling that worsens rapidly
For everything else — the typical sore, swollen, angry ankle — let’s move on to what you can realistically achieve overnight.
The “Overnight” Myth — And What You Can Actually Expect
Healing vs. Immediate Relief
Here’s the reality: true tissue healing takes time. Your body needs days (even weeks) to rebuild torn ligaments and restore full function. But don’t lose hope. There’s a huge difference between healing and feeling better fast.
Think of it like this: you won’t be running a marathon tomorrow, but with the right protocol, you can drastically reduce pain, control swelling, and get better mobility by morning.
That’s the magic of strategic nighttime recovery.
How Long Recovery Really Takes by Severity
- Grade I: 3–7 days (with proper care, pain relief is possible in 24–48 hours)
- Grade II: 1–3 weeks (significant improvement possible within a few days)
- Grade III: 3–6+ weeks (see a doctor immediately)
So while you won’t completely “heal” overnight, there’s a lot you can do to change how your ankle feels when you wake up.
What You Can Improve Overnight
By following the steps below, you can:
- Lower your pain levels drastically
- Control swelling and bruising
- Increase mobility
- Sleep better and wake up stronger
- Prevent further damage
You’re not just sitting around and waiting — you’re taking charge of your recovery.
Step-by-Step: What to Do Immediately After a Sprain
Step 1: Protect the Ankle – Stop Movement Immediately
As soon as you feel that twist, stop moving. Do not try to “walk it off.” That only worsens the damage. Sit down. If available, use crutches or lean on something sturdy to get off your feet.
Wrap your ankle loosely with a clean cloth or towel if a brace isn’t handy yet. Keep it still and elevated as soon as possible.
Step 2: Apply Ice the Right Way
Ice is your ankle’s best friend for the first 24 hours — if used correctly.
- How to Ice: Wrap ice in a towel (never apply directly to skin), then apply to the swollen area.
- Duration: 15–20 minutes every 1–2 hours.
- Best time: Especially before bedtime to calm inflammation overnight.
Pro Tip: Use a frozen bag of peas or a flexible gel pack for best coverage.
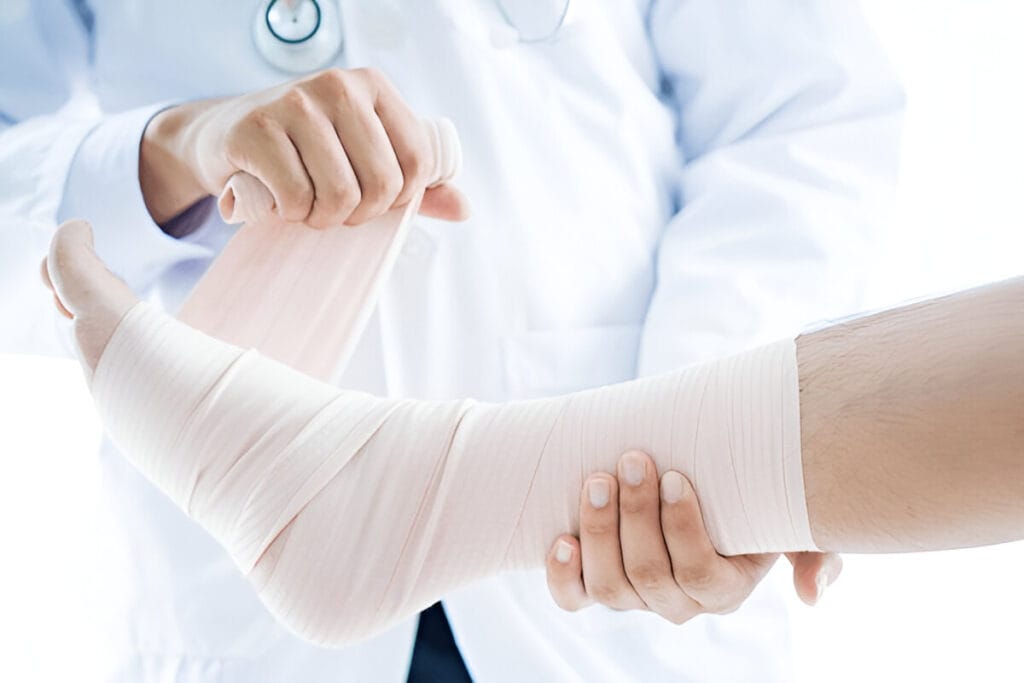
Step 3: Compression to Reduce Swelling
Compression prevents swelling from ballooning out of control and provides gentle support.
Use:
- Elastic bandage (like ACE wrap)
- Compression sleeve
- Adjustable ankle brace
Wrap from just above your toes up to your mid-calf. Not too tight — your toes shouldn’t go numb or turn purple.
Compression stays on overnight (looser while you sleep), and you’ll be amazed how much it helps by morning.
Step 4: Elevate — And Do It Correctly
Elevation works wonders to drain fluid away from your ankle and reduce pressure.
How to do it properly:
- Lie flat and prop your ankle above your heart level
- Use pillows or a foam wedge
- Stay in this position as much as possible the first 12 hours
Want to take it up a notch? Add a gentle foot pump motion (wiggle your toes) every hour while lying down to keep blood flowing and prevent stiffness.
Nighttime Recovery Routine (For Real Overnight Relief)
Before Bed: Anti-inflammatory, Soak, and Support
Now that you’ve iced, compressed, and elevated your ankle during the day, it’s time to optimize your body for overnight recovery. This is your prime healing window — your body does most of its repairing while you sleep. Let’s help it do the job better.
Anti-inflammatory strategy:
Take an over-the-counter anti-inflammatory like ibuprofen (Advil) or naproxen (Aleve), if approved by your doctor. These help with both pain and swelling and allow you to sleep more comfortably.
Warm soak (optional):
After the first 12–24 hours, if swelling is under control, you can try a gentle Epsom salt soak. Warm (not hot) water boosts circulation and relieves muscle tension. Add 1–2 cups of Epsom salt to a foot bath and soak for 15 minutes. Do not soak if your ankle is still visibly swollen or bruised.
Secure support:
Before getting into bed, re-wrap your ankle or wear a soft brace. This will stabilize the joint while you sleep and prevent accidental twists.
How to Sleep With a Sprained Ankle
Sleeping with a swollen ankle can feel like you’re babysitting a ticking time bomb. Here’s how to sleep smarter:
- Elevate it on a pillow or wedge above your heart level
- Lie on your back — side-sleeping can apply unwanted pressure
- Use a pillow barrier to prevent rolling over your ankle during the night
- Wear a breathable compression sock to keep things secure and comfortable
Avoid heating pads while sleeping — they can dilate blood vessels and worsen swelling if used too soon.
Morning Mobility Trick to Wake Up Pain-Free
When you wake up, don’t just hop out of bed — your ankle has been resting and is likely stiff.
Before standing:
- Wiggle your toes for 1 minute
- Gently rotate your foot in circles (if pain allows)
- Do light up-and-down pumps with your ankle
Once you’re up, walk slowly and assess how your ankle feels. If you followed the steps above, you should notice:
- Less swelling
- Improved flexibility
- More comfort when walking
Don’t ditch the brace or wrap yet — support your ankle for the rest of the day.
Advanced Tips to Accelerate Healing
Supplements and Nutrition That Help Tissue Repair
Healing isn’t just about what you do on the outside — it’s also about what you put into your body. Your ligaments need nutrients to rebuild. Here’s your injury recovery nutrition list:
- Vitamin C – for collagen production and immune support
- Zinc – promotes faster tissue repair
- Protein – amino acids fuel ligament regeneration
- Omega-3 fatty acids – reduce inflammation (found in salmon, flaxseed)
- Gelatin or collagen supplements – shown to support connective tissue healing
Stay hydrated and avoid sugary or ultra-processed foods, which can increase inflammation and slow healing.
Gentle Ankle Exercises (Even While Sitting!)
Once the worst swelling is down (often by Day 2), light movement can do wonders. Here are some safe, seated exercises to help restore blood flow and range of motion:
- Alphabet ankle: Trace the alphabet with your toes — A to Z.
- Toe curls: Scrunch and relax your toes like you’re picking up a towel.
- Heel taps: Lift your toes off the ground while keeping your heel planted, then tap down.
Repeat each for 1–2 minutes, 2–3 times a day. These gentle exercises wake up the ankle and prevent stiffness without adding strain.
Smart Bracing and Compression Gear
If you want to speed up recovery, don’t rely on random wraps and homemade solutions forever. Invest in quality tools that work:
- Compression ankle sleeves with graduated pressure
- Lace-up ankle braces that offer adjustable tightness and mobility
- Cold therapy wraps that combine icing with compression
Use braces during the day when walking and switch to softer sleeves at night. Over time, wean off them as pain decreases — don’t become dependent on support forever.
When to See a Doctor
Red Flags That Require Medical Attention
Most mild to moderate sprains heal well at home. But sometimes, what feels like a sprain could be a fracture, torn tendon, or dislocated joint. Call a doctor if you experience:
- No improvement in 48–72 hours
- You cannot put any weight at all on the ankle
- Swelling continues to grow
- Visible bone deformity
- Severe bruising spreading up the leg
- Sharp, stabbing pain on specific motion or touch
These are signs your injury might be more than a sprain. Don’t tough it out — prompt treatment prevents long-term issues.
Why X-rays Might Be Necessary
Doctors may order imaging to:
- Rule out a fracture
- Assess ligament tears
- Check for loose bone fragments
A proper diagnosis gives you a precise treatment plan — and peace of mind.
Common Mistakes That Make It Worse
Overusing Ice or Wrapping Too Tight
Too much of a good thing? Absolutely.
Common icing mistakes:
- Using ice too long (20 mins max per session)
- Applying ice directly to skin (can cause frostbite)
- Using ice after the first 72 hours when swelling is gone (switch to heat)
Wrapping mistakes:
- Wrapping too tightly, cutting off circulation
- Keeping compression on 24/7 without breaks
- Not elevating while compressing (they work best together)
If your toes feel cold or numb, loosen the wrap ASAP.
Walking Too Soon Without Support
“Just walk it off” is one of the worst things you can do. Walking too soon without a brace or crutches adds strain to healing ligaments and can restart the injury cycle.
Instead:
- Use crutches or a cane if needed the first day or two
- Slowly reintroduce weight-bearing while wearing a brace
- Gradually increase walking distance over several days
Trust the process — speed now equals strength later.
Ignoring Pain and Pushing Through
Pain is not weakness. It’s feedback.
Ignoring sharp pain and continuing to exercise or play sports can:
- Cause permanent ligament laxity
- Lead to chronic ankle instability
- Delay full recovery by weeks or even months
Listen to your ankle. Baby steps beat big leaps when you’re healing.
Recovery Timeline: What to Expect Over Days 1–7
What Happens on Day 1 vs. Day 3 vs. Day 7
Recovery isn’t linear. It happens in phases, and knowing what to expect can help you avoid frustration and setbacks.
Day 1 (Injury Day)
- Pain, swelling, and limited movement
- Focus: R.I.C.E. (Rest, Ice, Compression, Elevation), protection, and pain management
- Outcome: You’ll feel sore, but these steps start to stabilize your ankle
Day 2–3
- Swelling should begin to reduce
- Bruising may appear more visible (this is normal!)
- Introduce gentle movement and seated mobility exercises
- Continue wearing a brace or compression wrap
- Outcome: Discomfort persists but movement should improve slightly
Day 4–5
- You’ll feel stronger with less swelling
- Light weight-bearing becomes easier (if pain allows)
- Start range-of-motion exercises like ankle circles or toe raises
- Outcome: Noticeable healing progress
Day 6–7
- Significant reduction in pain and swelling
- Begin light walking with full support
- Begin proprioception (balance) exercises if tolerated
- Outcome: You’re nearly back to normal with the right care!
When Can You Return to Normal Activities
- Walking (unassisted): Within 3–7 days for Grade I, 1–3 weeks for Grade II
- Light exercise: After 7–14 days if no pain or swelling
- Sports/running: Typically 2–6 weeks, depending on severity
- Full recovery: Up to 6 weeks or more for severe sprains
Always progress gradually — no rushing. Trying to do too much too soon leads to re-injury.
The Best At-Home Treatments and Tools
Top Recommended Sprain Recovery Kits
If you’re serious about a quick recovery, having the right gear makes all the difference. Here’s a list of top tools to keep on hand:
| Item | Why It’s Useful |
|---|---|
| Ankle brace or wrap | Stabilizes ankle, prevents re-injury |
| Cold therapy compression wrap | Combines ice and pressure for faster swelling control |
| Foam elevation pillow | Keeps ankle above heart for optimal drainage |
| Mobility resistance bands | Perfect for gentle strengthening exercises |
| Epsom salt | Eases pain and improves circulation in soaks |
These tools aren’t just extras — they can shave days off your recovery timeline.
Essential Oils, Epsom Salt Soaks, and Home Remedies
Natural remedies can be a great sidekick to standard care.
- Epsom Salt: Magnesium sulfate reduces soreness and relaxes muscles
- Lavender Oil: Calms inflammation and promotes sleep
- Peppermint Oil: Natural cooling effect and pain relief
- Arnica Gel: Applied topically to minimize bruising and inflammation
Always dilute essential oils and do a skin test first to avoid irritation.
When to Use Heat Instead of Ice
Ice is your best friend the first 48–72 hours after injury. But after that, heat can become your healing ally.
Switch to warm compresses or heat packs once:
- Swelling has gone down
- Bruising starts to fade
- Your ankle feels stiff but not swollen
Heat increases blood flow, speeds up tissue repair, and feels pretty great too.
Conclusion
Let’s be real — healing a sprained ankle overnight sounds like a miracle. But now you know the truth: while you can’t fully heal overnight, you can absolutely feel dramatically better by morning.
By following the steps we’ve walked through — protecting, icing, compressing, elevating, and setting up a smart nighttime routine — you’ll be giving your ankle the best possible shot at fast recovery. Mix in proper nutrition, gentle exercises, and the right support tools, and you’re on your way to a confident comeback.
So don’t just sit there and suffer. Take action. Because every step counts — especially the first ones after a sprain.
FAQs
Can you actually heal a sprained ankle overnight?
Is it OK to walk on a sprained ankle?
What’s the fastest way to reduce swelling?
Can I wrap my ankle too tight?
Yes. If your toes feel cold, numb, or turn blue/purple, your wrap is too tight. Loosen it immediately. You want firm, not painful pressure.